Navigation
Attaching the SP25M probe body to the probe head
NOTE: To ensure optimum metrology performance it is recommended that following any probe change (either manual or automatic), the probe head is unlocked and locked.
The SP25M probe body can be mounted on a PH10M PLUS, PH10MQ PLUS or PH6M probe head by means of the Renishaw autojoint. Locking and unlocking the autojoint is carried out manually using the S10 autojoint key or automatically using a Renishaw autochange rack system (ACR1 or ACR3). In both cases, the connection eliminates the need for probe requalification (recalibration) after changing tools.

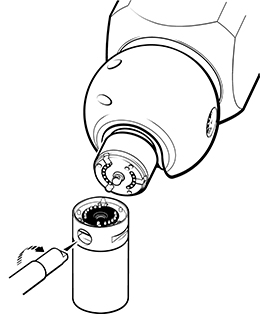
- Ensure the slot at the rear of the SP25M body is horizontal and lying across the probe axis. This is the unlocked position.
- Carefully position the SP25M probe body underneath the probe head ensuring that the dots on both the body and head are aligned.
- Connect and hold the probe body and probe head together.
- Insert the S10 autojoint key into the slot on the back of the probe body and turn clockwise until it locks tight. If intending to autochange the probe body in an ACR1 or ACR3 rack then the slot should be rotated five degrees anticlockwise from the fully clockwise position.
- Unlock and lock the probe head before using the probe.
To remove the SP25M probe body from the probe head, reverse the steps detailed above.