Navigation
Datuming MCR20
NOTES: Renishaw recommends that datuming of the MCR20 is performed using the Renishaw PS2R stylus supplied. If a different stylus is to be used, the length (L) must be either 20 mm or 30 mm and the appropriate ball radius (R) must be used to calculate offsets.
It is strongly recommended that the EM1 STD and EM2 STD probe extension modules are not used for datuming of the MCR20, as the extended probe length may lead to increased concentricity errors within the probe system.
The following instructions assume that uncompensated probing points are taken, and therefore that the target positions for port docking are absolute machine co-ordinates.
Aligning MCR20 to the CMM axes
To align the MCR20 probe module changing rack to the axes of your CMM, carry out the following procedures:
- Latch all port lids in their open position by pushing each lid fully open and engaging the locking pegs into the slots in the docking plate.
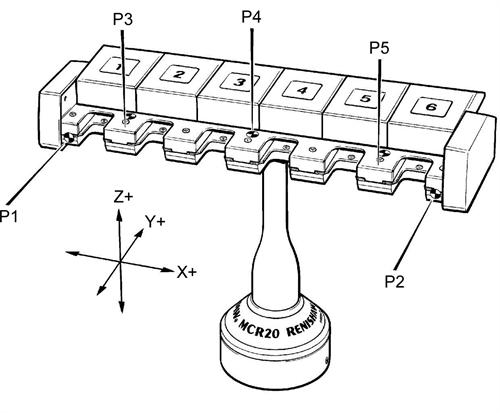
- Take points P1 and P2.
- Using the 1.5 mm hexagonal key supplied, fully release the M3 cone point grubscrew within the base of the MCR20.
- Adjust the orientation of the MCR20 until the runout between points P1 and P2 is less than 0.25 mm. Retaining the MCR20 in this position, re-tighten the M3 cone point grubscrew (0.5 Nm - 1 Nm) using the 1.5 mm hexagonal key supplied.
Establishing the docking depth (Y)
To establish the docking depth (Y) of the MCR20 ports, carry out the following procedure:
- Take points P1 and P2.
- Establish the docking depth for all ports using the following formula:
{Y value of line P1/P2 + R (1 mm) + 8.75 mm}
where R = stylus ball radius
Establishing the docking height (Z)
To establish the docking height (Z) of the MCR20 ports, carry out the following procedure:
- Take points P3, P4 and P5. From the three points taken, construct a Z axis plane for the rack.
- Establish the docking height for all ports using the following formula:
{Z value of plane P3/P4/P5 – L (20 mm) – R (1 mm) – 21.25 mm}
where L = stylus length
Establishing the docking centre for port 1
To establish the docking centre for port 1 (X1), carry out the following procedure:
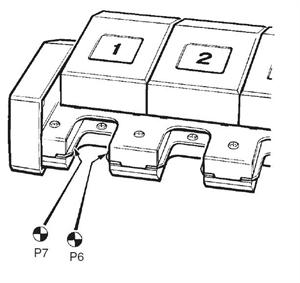
NOTE: The stylus shank may be used to take points P6 and P7.
- Take points P6 and P7.
- Establish the docking centre for port 1 (X1) using the following formula:
{centre point of P6/P7 = X1}
Establishing the docking centre for ports 2 to 6
To establish the docking centre for ports 2 (X2) to 6 (X6), perform the following calculations:
Docking centre port 2 (X2) = X1 + 30 mm
Docking centre port 3 (X3) = X2 + 30 mm
Docking centre port 4 (X4) = X3 + 30 mm
Docking centre port 5 (X5) = X4 + 30 mm
Docking centre port 6 (X6) = X5 + 30 mm
Establishing the docking target co-ordinates
CAUTION: The Y values may be different for each port if the MCR20 is not aligned with the CMM axes.
To establish the docking centre co-ordinates of ports 1 (X1) to 6 (X6), perform the following calculations:
Port 1 = X1, Y, Z
Port 2 = X2, Y, Z
Port 3 = X3, Y, Z
Port 4 = X4, Y, Z
Port 5 = X5, Y, Z
Port 6 = X6, Y, Z