Navigation
Manual probe heads description and operation
Renishaw manual probe heads provide the mechanical and electrical connections required when using the majority of Renishaw touch-trigger probes on a co-ordinate measuring machine (CMM).
Installed within the quill of the CMM via the shank supplied, a manual probe head permits a CMM touch-trigger probe to be held rigidly in position. It also allows a touch-trigger probe to be connected to a Renishaw probe extension bar and probe knuckle joint for improved probe orientation and component penetration (where indicated).
PH1 manual probe head
The PH1 is a general purpose, swivel-type probe head. Its compact design makes it ideally suited to a CMM where manual orientation of a Renishaw M8 touch-trigger probe is required.
The PH1 provides two axes of movement. The A-axis allows probe orientation in the vertical plane; the B-axis allows rotational probe orientation. Axis rotation is in relation to the shank mount.
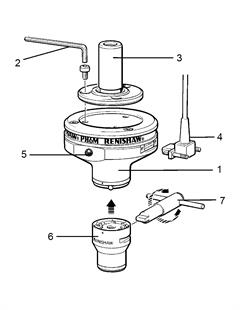
The PH1 manual probe head incorporates the following primary components and is supplied with the following tools:
- PH1 probe head [1]
- Probe cable (to probe interface) [2]
- Shank [3]
- 2.5 mm AF Allen key [4] (for tightening the shank socket screws)
- 2 mm AF Allen key [5] (for adjusting the B-axis locking force)
- Probe status LED [6]
- 3 mm AF Allen key [7] (for adjusting the A-axis orientation)
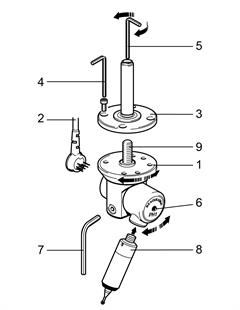
| 1 | PH1 probe head |
| 2 | Probe cable (not supplied) |
| 3 | Shank |
| 4 | 2.5 mm AF Allen key |
| 5 | 2 mm AF Allen key |
| 6 | Probe status LED |
| 7 | 3 mm AF Allen key |
| 8 | TP2 5-way touch-trigger probe (not supplied) |
| 9 | B-axis force adjustment screw |
The A-axis may be swivelled through ±115° and locked in position using the 3 mm AF Allen key [7] supplied. For instructions on how to move and lock the A-axis, see 'Moving and locking the A-axis'.
The B-axis is indexable, in 15° steps, through 360°. For instructions on how to move and lock the B-axis, see 'Moving and locking the B-axis'.
Connection of the PH1 to the CMM is via the probe cable [2] and an appropriate probe interface (not supplied).
The status of the probe is indicated by the probe status LED [6]. This is normally lit when the probe is ready for use and extinguishes as the probe triggers.
Technical data - PH1
| Number of sockets | One |
| Style of probe joint | M8 bush |
| Probe status indication | One LED located on the A-axis swivel |
| Cable connection | Renishaw standard 5-pin DIN 180 socket |
| Overtravel break load | Adjustable from 0.02 kgf (0.44 lbf) to locked solid |
| A-axis indexing | ±115° |
| B-axis indexing | 15° steps through 360° |
| Weight (excluding shank) | 125 g (0.28 lb) |
Installing and connecting the PH1
For instructions on how to install and connect the PH1, see “Installing a manual probe head”.
Moving and locking the A-axis
The A-axis may be swivelled through ±115° and locked in any position, as described below:
- Insert the 3 mm AF Allen key [2] (supplied) into the Allen cap-head screw [1] located within the B-axis body.
- Rotate the Allen key [2] in the counter-clockwise direction to release the holding pressure on the A-axis [3].
- Swivel the A-axis [3] into the required position.
- Hold the A-axis [3] in this position, and reassert the holding pressure on the A-axis by rotating the Allen key [2] in the clockwise direction.
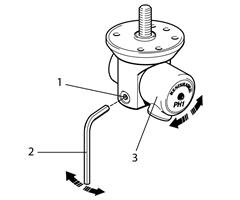
| 1 | Cap-head screw |
| 2 | 3 mm AF Allen key |
| 3 | A-axis |
Moving and locking the B-axis
The B-axis locking force of the PH1 can be adjusted so that no B-axis rotation is possible. If the PH1 will not index by hand, the locking force must be decreased.
To decrease the locking force, see 'Locking the B-axis'.
Moving the B-axis
The B-axis of the PH1 can be indexed in 15° increments throughout the 360° axis of rotation. Do this as described below:
- Hold the A-axis of the PH1.
- Rotate the B-axis of the probe to the required step.
- Release the A-axis.
Locking the B-axis
Adjust the holding force of the B-axis as described below:
- With the PH1 removed from the quill of the CMM, insert the 2.5 mm AF Allen key [1] into the centre of the shank [2] until it locates the head of the B-axis force adjustment screw [3].
- Adjust the B-axis force adjustment screw [3] as follows:
- Rotate clockwise to increase the holding force
- Rotate counter-clockwise to decrease the holding force
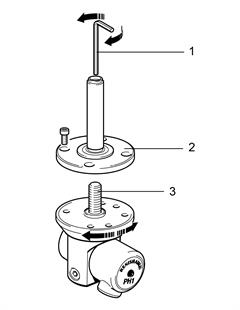
| 1 | 2.5 mm AF Allen key |
| 2 | Shank |
| 3 | B-axis force adjustment screw |
PH6 manual probe head
The PH6 is a compact, vertically mounted probe head that is ideally suited to a manual CMM where a single probe is required. It can be used with TP2, TP6, and TP20 touch-trigger probes.
The PH6 incorporates the following primary components:
- PH6 probe head / shank assembly with integral cable [1]
- Probe status LED [2]
The status of the probe is indicated by the probe status LED [2] that is located within the body of the probe head. During normal operation, the LED indicates the probe status as follows:
- LED illuminated: Probe is seated and is ready for use
- LED extinguished: Probe has triggered / no probe is fitted
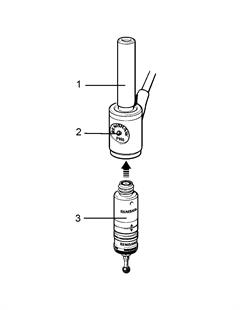
| 1 | PH6 probe head, shank and integral cable |
| 2 | Probe status LED |
| 3 | Touch-trigger probe (not supplied) |
Technical data - PH6
| Number of sockets | One |
| Style of probe joint | M8 bush |
| Probe status indication | One LED |
| Cable connection | Dedicated integral cable |
| Weight (excluding shank) | 48g (0.11 lb) |
Installing and connecting the PH6
For instructions on how to install and connect the PH6, see 'Installing a manual probe head'.
The PH6 is fitted with an integral cable, connector, and shank. These cannot be changed.
PH6M manual probe head
The PH6M is a fixed probe head that incorporates the Renishaw autojoint [6]. It has the ability to convey complex probe signals via its 15-way micro ‘D' connector, thus permitting the use of the Renishaw TP7 high accuracy touch-trigger probe and OPT6M optical touch-trigger probe.
The PH6M incorporates the following primary components and is supplied with the following tools:
- PH6M probe head [1]
- 2.5 mm AF Allen key [2] (for tightening shank socket screws)
- Shank [3]
- Probe status LED [5]
- Autojoint adaptor [6]
- S10 joint key [7]
| 1 | PH6M probe head |
| 2 | 2.5 mm AF allen key |
| 3 | Shank |
| 4 | Multiwired probe cable (not supplied) |
| 5 | Probe status LED |
| 6 | Autojoint adapter (not supplied) |
| 7 | S10 joint key |
Locking and unlocking the autojoint is performed either manually using the S10 joint key [7] supplied, or automatically using the Renishaw autochange system. This allows probes to be changed without the need to requalify.
The status of the probe is indicated by the probe status LED [5]. This is normally lit when the probe is ready for use and extinguishes as the probe triggers.
Technical data - PH6M
| Number of sockets | One |
| Style of probe joint | Multiwired autojoint |
| Probe status indication | One LED |
| Cable connection | 15-way micro D' connector |
| Autojoint repeatability (2σ) | 1 µm (0.00004 in) using a TP6A touch-trigger probe and 21 mm stylus |
| Weight | 160 g (0.36 lb) |
Installing and connecting the PH6M
For instructions on how to install and connect the PH6M, see 'Installing a manual probe head'.
The PH6M is fitted with an integral 15-pin micro ‘D' socket. If required, this socket can be adapted by using a suitable cable to which a 5-pin DIN socket has been fitted.