Bu sayfa şu anda sizin dilinizde mevcut değildir. Google'ın Çeviri sistemini kullanarak
otomatikleştirilmiş çeviriye
ulaşabilirsiniz. Bu hizmeti sağlamaktan sorumlu değiliz ve çeviri sonuçları tarafımızdan kontrol edilmemiştir.
Eğer daha fazla yardıma ihtiyaç duyarsanız lütfen
bizim ile temasa geçiniz.
The accuracy of rotary encoders
Rotary (angle*) encoders are used in a huge variety of machines and devices. A rotary encoder consists of a position measurement readhead and an accurate rotary scale marked either on the periphery of a ring or on the face of a disc. The readhead measures position by optically sensing the regularly-spaced scale markings and outputs this information as an analogue or digital signal. The signal is subsequently converted into a position reading by a digital readout (DRO) or motion controller. This white paper outlines the major factors affecting rotary encoder performance to help designers choose the best encoder system for their chosen application.
Precision rotary motion is required in many modern automation systems such as rotary format computer-to-plate (CTP) pre-press machines, machine tool A, B and C axes, surface mount machines, form measurement systems, wafer handling and inspection devices, and goniometers. Different applications demand different combinations of encoder performance and features to optimise their function – some require accuracy, others require repeatability or high resolution or low cyclic error for velocity loop control. Selecting the encoder that offers the optimum balance of specification and function is a real challenge and few encoders are capable of meeting all requirements.
Precision motion control depends on both the accuracy and the dynamic response of the system. Accurately measuring position is important, but without the ability to control position accurately, the system cannot perform. Direct drive rotary motors (or torque motors) develop high torque and enable precision servo control over very small angles. Their dynamic response is excellent because the load is coupled directly to the drive, eliminating the need for transmission components that introduce backlash, hysteresis, gear tooth error or belt stretch. The frameless format of torque motors with large internal diameters offers no obvious coupling to fit a shaft encoder, but a rotary ring encoder provides a convenient solution. Furthermore, like the load, the rotary encoder is also coupled rigidly to the drive, eliminating unwanted slack in the system. In any measurement or control system, it is preferable for the encoder to be as close to the drive as practically possible – this helps to minimise potential shaft resonances that influence servo performance, particularly as servo bandwidths increase.
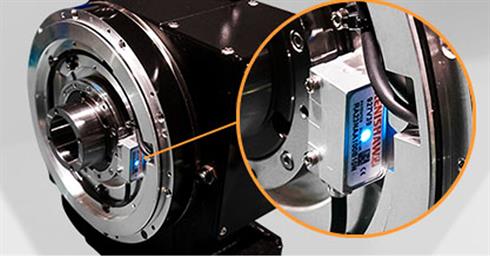
Figure 1. Renishaw's RESOLUTE™ RESA rotary encoder installed on a direct drive motor (SOLPOWER, Taiwan).
An excellent solution for providing precision angular position feedback is a rotary encoder. As with motor selection, choosing the correct rotary encoder depends on a realistic requirement specification, knowledge of the factors affecting encoder accuracy and a good understanding of how performance shortfalls may be overcome. When selecting a rotary encoder, it is wise to consider a range of parameters beyond just accuracy and resolution, such as data rates, system size, complexity and cost. Linear encoders are available with accuracy and resolution measured in tens of nanometres, and angle encoders can provide measurement performance below an arc second.
An arc second is a small angle that:
- Is subtended by an arc length of 1 micron at a radius of 206.25 mm.
- Is subtended by a distance of 30 m at the surface of the earth
- Can be resolved at a data rate of 1.3 MHz at 1 rev/sec.
When determining the measurement performance that is required, it is useful to consider precision, resolution and repeatability:
- For applications demanding repeatability (e.g., a pick and place machine), the exact angle of each station issecondary to the system's ability to stop movement at the same encoder count time after time.
- For continuous smooth motion, the encoder resolution and precision selected must not allow jitter within the control servo bandwidth.
- For a slow-moving device such as an astronomical telescope, accurate angular measurement is more important than the maximum system data rate.
- For high-speed systems, trade-offs between velocity and positioning accuracy may arise; coarser pitch (lower line count) encoders suit high data rates, but finer pitch (higher line count) encoders usually provide lower interpolation errors.
Selection of the appropriate encoder is much easier after the system accuracy requirements are understood. Despite some manufacturers' claims, achieving highly accurate rotary measurement is rarely ‘plug and play' – understanding the error budget is the key to optimising performance. Although this whitepaper references encoder rotary rings as shown in Figure 3, the same arguments apply to face-read rotary discs such as Renishaw's RCDM encoder scale as shown in Figure 2.
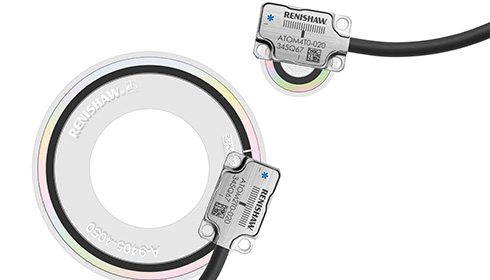
Figure 2. ATOM™ encoder readheads on RCDM disc scale.
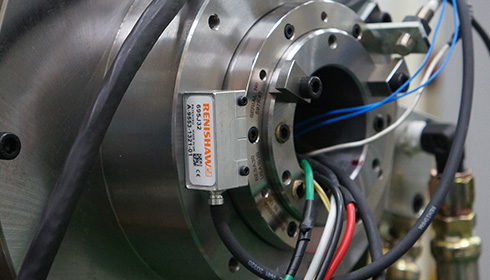
Figure 3. DDR rotary table application with RESOLUTE encoder in-situ (ITRI, Taiwan).
Building the error budget
Think of a child at school measuring the angle between two pencil lines on a piece of paper with a plastic protractor. They will lay the protractor directly on the paper so that the baseline of the protractor is directly over one of the lines and adjust its position until the origin coincides with the point where the two lines meet. They will then read off the angle between the lines on the graduated scale, interpolating if necessary to give the resolution they need. The first few times, their reading may differ from the teacher's reading who will need to stress the importance of getting the protractor accurately centred and aligned with respect to the lines. These alignment errors are likely to have a bigger effect on the measured angle than any irregularity in the angular scale moulded into the plastic protractor.
Our child has learned three rules of accurate angular measurement:
- To align the centre of the rotary scale as closely as possible with the vertex of the angle being measured.
- To keep the measurement scale as close as possible to the item being measured.
- To minimise relative (angular) motion between the measurement scale and the item being measured.
Three other factors that may not have been considered are:
- The circumferential distance between the graduations should be consistent around the circle.
- The radial distance between the centre of the radial scale and the edge of the scale where the measurement is made should be the same for all angular positions.
- The angle measurement should be taken by viewing the line perpendicularly through the protractor to minimise parallax error.
These prerequisites apply equally to a rotary encoder in a machine as to a plastic protractor on a page.
In Figure 5, the component of interest whose angular motion is to be measured or controlled rotates on a shaft mounted on two bearings. An angle encoder with an integral bearing is coupled to this shaft and read by a readhead mounted on the non-rotating structure. Considering the rules above, for the encoder system output to reflect the actual rotary motion of the component, the following must apply:
- Each part of the system must rotate in its bearings without radial runout (i.e., lateral motion) of its axis of rotation.
- The shaft system connecting the component of interest to the encoder should be rigid in torsion.
- The coupling should be designed such that the angular motion of the encoder rotating in its bearing is the same as that of the component of interest rotating in its own bearing system; i.e., a constant velocity joint is needed.
- The spacing of the lines around the edge of the encoder scale should be uniform and the readhead should interpolate between them in a linear manner.
- The encoder scale should be truly circular with the axis of rotation passing perpendicularly through its centre.
- The readhead should read the scale without parallax or other geometric errors and be rigidly mounted to the non- rotating frame of reference.
If any of these conditions are not satisfied, there will be discrepancies between the angular position of the component of interest and the angular position reported by the encoder system. By investigating each of these potential sources of error, it is possible to determine their magnitude and thus the total error budget for the whole system.
Effect of bearing wander
The term ‘bearing wander' is used to describe a variety of system attributes that result in a radial run out (or lateral translation) of the component's and/or the encoder's axis of rotation. Radial runout consists of both repeatable and non- repeatable components that can be ascribed to deficiencies in the bearing system: including play, higher harmonics (e.g. ball and race imperfections) and eccentricity (see Figure 4).
The magnitude of the radial run-out of a spindle running on rolling bearings is affected by the design and adjustment of the bearing system, but is typically more than ±1 µm. As the encoder system can resolve the circumferential position of its rotary scale to at least a tenth of this value, it can be seen that the errors caused by bearing wander can swamp those caused by the remainder of a well designed system. The error contribution of bearing wander is given by:
Angular measurement error (arc seconds) = bearing wander (μm) x 412.5/D where D is the diameter of the encoder scale in mm.
Despite displaying cyclic components, this measurement error can be difficult to evaluate, as any error map used to compensate would have to map many spindle revolutions.
For high accuracy systems the use of well-designed air bearings is preferred as radial run-out can be reduced to sub-micron levels by correct selection of the bearing radial stiffness. When using air bearings, the effect of out-of-balance forces must be considered: at low speed the spindle will rotate about its geometric centreline, but at high speed, when the effect of out-of-balance centripetal reaction force exceeds the radial stiffness of the bearing and its mounting, the spindle will rotate about its centre of mass. Although this transition typically occurs at high speeds, it may introduce a discrepancy of several microns between the static and dynamic centre lines. This radial run-out is repeatable and therefore predictable at one cycle per spindle revolution.
Whatever the bearing used, the following should be noted:
- For the system illustrated in Figure 5, only the bearings supporting the encoder will contribute to bearing wander error. Any advantage this brings, however, may bereduced by additional errors introduced by the coupling.
- Although techniques exist to eliminate the effect of bearing wander (particularly the use of two or more readheadson the same encoder scale), the purpose of the angular measurement must be considered:
- For example, when using a theodolite to measure the angular separation between points in the horizontal or vertical plane; even significant bearing wander can be compensated using just two readheads.
- If position feedback is required to locate a given point on the rotating component using polar co-ordinates (as with a wafer inspection machine), unless three or more readheads are used on the same encoder ring, any axis wander of the bearing supporting the component of interest will affect positioning accuracy.
Where larger amounts of bearing wander are unavoidable, consideration must be given to the selection of an appropriate scale pitch. As a rule of thumb, where the incremental signal is the average of 2 or more readheads with the reference mark derived from one, the scale pitch should exceed the bearing wander by a factor of 3 to 4 – any less than this and problems with reference mark repeatability may become significant, unless compensation techniques, such as Renishaw's propoZ™ technology, are used.
Effect of coupling errors
Figure 5 shows a system with a self-contained angle encoder with its own bearings connected to the component of interest via a coupling. This design has the advantage that only the wander in the encoder bearing will impact angular measurement accuracy. However, this ‘benefit' must be considered with caution because wander in the main bearings will affect positioning accuracy if the system is designed to return the polar co-ordinates of a point on the component of interest rather than the angular bearing of a distant object.
The design of the coupling itself may also have a significant impact on system accuracy.
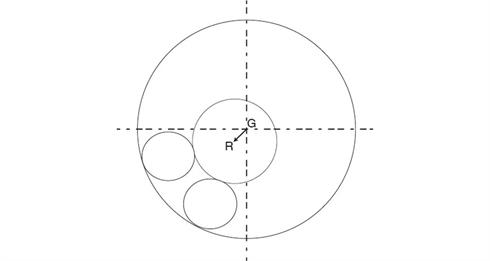
Figure 4. Bearing runout contributes to total eccentricity and is the displacement of the axis of rotation (R) from the geometric centre (G)
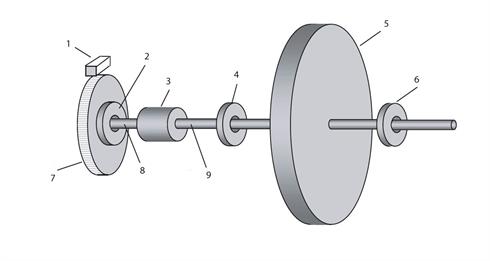
Figure 5. Generic machine system. 1) Readhead, 2) Encoder bearing,
3) Coupling, 4) Component bearing, 5) Component of interest,
6) Component bearing, 7) Encoder scale 8) Encoder shaft,
9) Component shaft
It is beyond the scope of this article to fully document the deficiencies of different coupling designs but important factors to consider are:
Backlash
Any backlash in the rotary drive systems will introduce differences in reported angular position that vary with direction of rotation – these can have the most significant impact on system repeatability.
Torsional stiffness
The coupling may not be as stiff as the shafts it connects and may therefore be affected by vibration/resonance and shaft wind-up, which if used in a feedback loop could significantly affect transient performance, settling time, permissible closed loop gain and bandwidth.
Angular error
Most couplings can, under certain conditions of alignment, introduce angular error between the driving shaft and the driven (e.g. an Oldhams coupling gives a 4-per-rev error if the axes of the 2 shafts are not parallel). For high accuracy systems the angle encoder should be rigidly mounted on the same shaft as the component of interest and rotate in the same bearings.
Effect of shaft torsion
Lack of torsional rigidity in the shaft(s) between the component of interest and the angle encoder scale will induce dynamic errors which will degrade system performance. To minimise this effect, a non-contact encoder mounted as close as possible to the component of interest is recommended(see Figure 6).
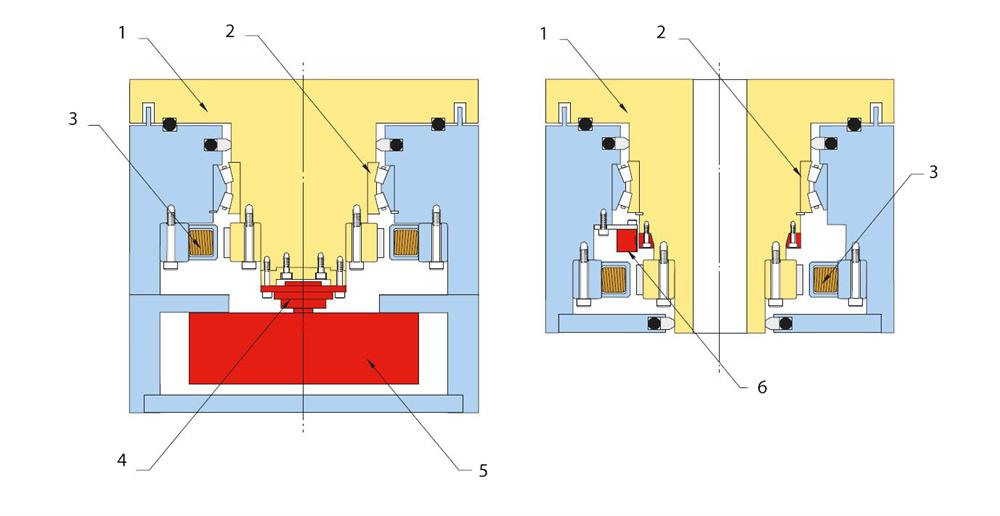
Figure 6. Sealed encoder and open ring encoder. 1) Shaft, 2) Bearing, 3) Motor, 4) Shaft coupling, 5) Sealed encoder, 6) RESM angle encoder
Effect of scale eccentricity and distortion
Accurate angular measurement can be achieved most simply by reading a metrological scale of uniform linear graduation that is positioned at a constant distance from the axis of rotation. Variations in radius of these scale markings, as caused by an eccentric mounting of a perfectly round rotary scale, can generate errors that vary once per revolution. Scale distortion can product other errors varying two or more times per revolution.
Consider a perfectly round scale of radius r0. It is mounted to rotate about a point at a distance a1 from the nominal scale centre at a phase angle Φ1 (see Figure 7). At an arbitrary azimuth angle, θ1 , the distance from the centre of rotation to the scale surface, Rθ, will be given by:
Rθ = r0 − a1cos(θ − Φ1)
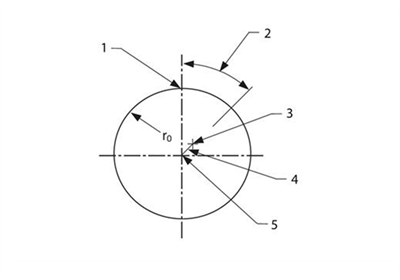
Figure 7. Scale eccentricity error arises when the centre of rotation of a rotary scale is displaced from the scale geometric centre.
1) Nominal zero azimuth, 2) Phase angle Φ1 3) Centre of rotation
4) Eccentricity a1 5) Centre of scale
The true radius will therefore vary sinusoidally once per revolution with an amplitude equal to the eccentricity.
To add the effects of scale distortion, the overall shape of the ring can be considered to be the summation of a series of sine waves of differing frequency n, phase Φn and amplitude an such that the scale radius at azimuth angle θ is given by:
Rθ = r0 − a1cos(θ − Φ1) − a2cos(2θ − Φ2) − a3cos(3θ − Φ3) − …….. − ancos(nθ − Φn )
It can be shown that the maximum circumferential error En induced by a sinusoidally varying distortion of amplitude an (mean to peak), cycling n times per revolution is given by:
±E. = an/n
In the simplest case, an eccentricity (i.e., n = 1) of 1 µm will induce a ±1 µm sinusoidal linear error at the circumference.
The higher order scale distortions, which will be of increasingly smaller amplitude, will have a progressively smaller effect on scale accuracy. The lower harmonics will have significant impact: error effects caused by eccentricity can be of a similar magnitude to the effect of bearing wander.
Renishaw's rotary encoder ring scales display a small amount of geometric distortion when installed on a taper mount and this might suggest that metrology will be affected by eccentricity and distortion, and in particular the effects of a potential lobing induced by the multiple securing bolts and the taper mount (as shown in Figure 8). However, on a standard installation of a 200 mm ring secured using twelve bolts tightened to the correct torque settings, no appreciable errors are introduced; the error ‘noise' at twelve cycles per revolution being approximately ±0.05 µm.
On a typical installation, eccentricity is responsible for 60% or more of the error (due to that installation) with the lower harmonics (predominantly 2nd to 4th) producing a progressively smaller proportion of the installation error.
Fortunately, errors induced by eccentricity and distortion respond to compensation techniques, the most powerful of which is the use of multiple readheads. Employing two readheads will remove errors due to eccentricity and all other odd harmonics.
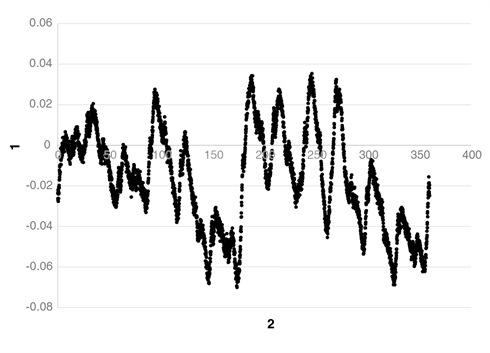
Figure 8. 12-cycle per rev error due to lobing on a rotary encoder ring.
1) Position error (µm), 2) Angle of rotation (⁰)
Four readheads have been employed in some installations to good effect but adding more readheads tends to give a progressively lower return on investment: careful selection of the ring cross-section offers a more powerful way of limiting the higher distortion harmonics.
The patented taper mount used on Renishaw's scale ring installations effectively converts a potentially eccentric and distorted ring into one with a small degree of swash, which has a significantly lower impact on accuracy. For example, the taper mount turns 1 µm of eccentricity on a 200 mm ring into a concentric ring with 0.002° of swash, thus increasing measurement accuracy without requiring the use of multiple readheads.
Effect of scale swash
Swash refers to the condition where the angle encoder scale is mounted concentrically with the component of interest, but has its geometric axis inclined to the axis of rotation (as shown in Figure 9). Viewed from the side, i.e., radially, this would have the effect of imparting a once-per-revolution sinusoidal axial motion to the periphery of the angle encoder scale.
Swash imparts two distinct but subtle error mechanisms. For the first mechanism, let us consider a rotary encoder scale (with axial graduation) of 200 mm diameter mounted with 0.1° of swash.
During installation, the scale has been adjusted to be concentric using a dial gauge (DTI) running on the scale surface. During one revolution, not only will the scale move axially by ±0.175 mm relative to the readhead, but the yaw angle of the scale graduations will also change through ±0.1° either side of their nominal value. If the readhead has been positioned in the same location as the DTI (as shown in Figure 10), then the error produced will be second order. However, should the readhead be displaced axially from that point by 1 mm; the combination of axial motion, change in yaw and readhead position will induce an error of approximately ±1.74 µm at the circumference (±3.6 arc seconds) varying sinusoidally once per revolution.
The second mechanism is as follows: a round coin viewed face on, appears circular. If that coin is then swashed with respect to the eye, it will appear elliptical. The impact of swashing a rotary scale is similar and has the effect of imparting a twice-per-revolution error, the magnitude of which is inversely proportional to the cosine of the swash angle. This is a second order effect, and in the example above would give errors in the order of ±0.16 arc second: for most applications this error mechanism can be ignored.
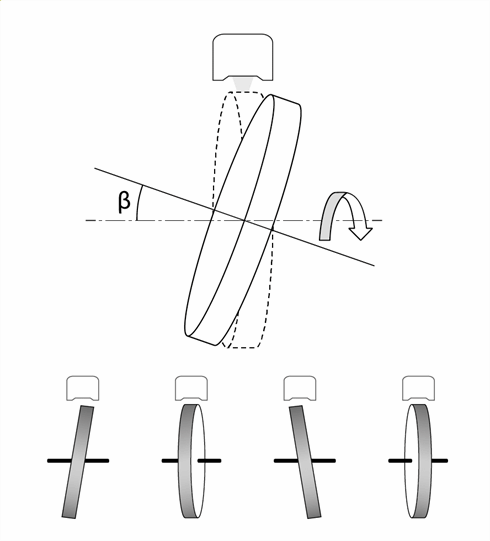
Figure 9. Swash error occurs when the geometric axis of the encoder scale is inclined to the rotational axis.
Effect of readhead induced errors
Metrological scale is only part of an encoder system: the readhead also contributes to the overall error budget. The most significant readhead induced errors are as follows:
Sub-Divisional Error
A rotary encoder scale with 3,600 graduations will have one graduation every 0.1° or 360 arc seconds. If the required resolution is finer than this scale pitch then the readhead will be required to interpolate. Any non-linearity in the interpolation will result in cyclic error, also known as Sub-Divisional Error (SDE).
Considering a Renishaw readhead as an example, the scale and readhead index grating produce optical fringes which move laterally across the readhead photo-detector with movement of the scale. These fringes are sinusoidal in intensity and are decoded by the readhead into two sinusoidal voltages 90° out of phase to each other.
If these two voltages are plotted against each other on an oscilloscope, a circular Lissajous is generated which rotates once per scale pitch of movement. If this Lissajous is perfectly circular and centred on the origin, it rotates at a velocity exactly consistent with the scale motion; if the means of interpolation has truly uniform angular discrimination then the readhead interpolation will be perfect, otherwise SDE will occur.
As SDE tends to occur at high frequency, mapping does little to eliminate the effects of SDE, but averaging over small distances can be effective for certain applications.
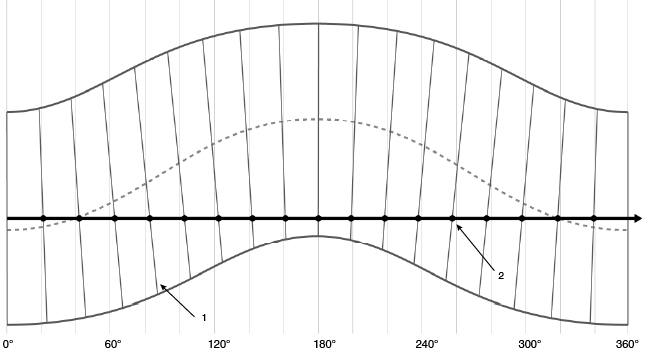
Figure 10. Scale oscillation with rotation angle due to the effects of swash. The thick black line indicates the readhead / DTI position on the scale and the dotted line marks the scale centreline. The black dots indicate the apparent position of each scale marking as the scale rotates under the readhead.
1) Scale markings, 2) Readhead position on scale
Parallax error
If the distance between the scale and readhead changes (due to, for example, ring eccentricity, temperature change etc.), then errors will be induced unless the readhead is correctly aligned with respect to the scale rotational centreline. If the readhead is pitched then a change in ride height will induce measurement errors proportional to the sine of the pitch angle, as shown in Figure 11.
Mounting stability
The rigid and secure mounting of the readhead is vital to accurate and repeatable angular measurement. The system should be designed such that the readhead does not move with respect to the scale axis of rotation with changes in attitude, loading, temperature, vibration etc.
Should the system give unexpectedly high unrepeatable errors, it is worth checking that the bolts securing the readhead and associated brackets and mountings have not loosened over time.
Effect of scale graduation accuracy
Consider the manufacturing process of an angle encoder where the graduations are marked directly onto the substrate as opposed to being marked on a linear scale which is subsequently secured to the circumference of a disk or ring. The manufacturer may secure the scale blank to a mandrel which is then rotated to position each graduation. On completion of the graduation process, but before removing the graduated scale from the mandrel, the measured scale accuracy (discrepancy between the actual and intended position of the graduations) is called ‘graduation error'. Were this measurement to be repeated, but this time using a correctly adjusted readhead, the error would, in addition to the graduation error, include components due to the readhead (significantly SDE); this is called ‘system error'.
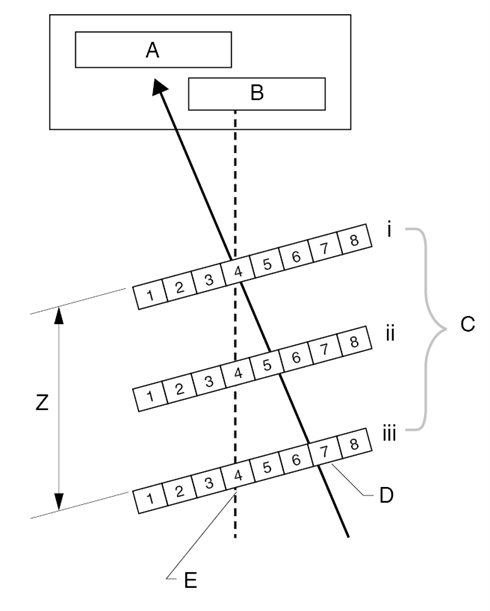
Figure 11. Parallax error is a measurement error caused by varying the rideheight of an encoder readhead when the scale is pitched (relative to the readhead). As shown, light from the source is incident on scale position 4 but the detector reads positions 5 and 6 as the rideheight increases.
A) Detector, B) Source, C) Different heights, D) Apparent position seen by detector, E) Actual position of incident beam on scale
If the angle encoder is now removed and remounted on the same or a different mandrel and its accuracy checked with a readhead, again the error recorded would be different. This difference would correspond to the error caused by the change in eccentricity and higher order out-of-roundness of the encoder scale between its initial installation for graduation and its reinstallation for use.
The overall error measured in this instance is called ‘installed error' and is the error definition that most closely reflects the performance achieved by the user in the field.
To summarise:
Graduation error = Error in spacing of graduations during manufacture.
System error = Graduation error + SDE
Installed error = System error + Effects of installation differences.
In typical installations, these errors tend to be of differing magnitudes; the results taken from testing a significant number of 200 mm diameter Renishaw rotary encoders are given in Table 1. One micron corresponds to 2.06 arc seconds at this diameter.
| Error type | Typical error on ø200 ring µm | Typical error on ø200 ring Arc seconds |
| Graduation error | 0.5 | 1.0 |
| System error | 0.53 | 1.1 |
Typical installed error (1 readhead) | 2.5 | 5.2 |
Typical installed error (2 readheads) | 1.0 | 2.1 |
Table 1 - Error contributions to the total installed error on a 200 ring.
Graduation error and system error are defined by the encoder manufacturer, but responsibility for the additional ±2 µm of installed error lies with both the manufacturer and the customer. Even if the customer were able to mount the encoder perfectly concentric and circular, there would still be a difference between the system and installed errors (unless the customer mounted the ring in exactly the same position as the manufacturer did to graduate it).
The causes of graduation error depend on the manufacturing technique:
- For angle encoders made by the scribing/etching of individual axial lines round the edge of the disc/ring, graduation error is caused by errors in the dividing process.
- For radial glass encoders made using mask and etch techniques, graduation error is caused by both errors in the accuracy of the mask and errors in the placement of the mask during etching.
- For an angle encoder system that secures linear scale around the circumference of a prepared shaft, graduation error is caused by the accuracy of the linear scale manufacture, changes in both the thickness of the linear scale and radius of the prepared shaft and differences in tension in the linear scale as it is secured to the shaft.
This last form of graduation error can vary after preparation as changes in temperature coupled with differences in coefficient of thermal expansion between the scale and the shaft may cause the scale to creep relative to the shaft surface. Relaxation of the glue, if used to secure the scale, may increase this effect.
Considering Renishaw encoder rings and discs, and other rotary scales where the graduation error does not vary with time, graduation error will be predictable from revolution to revolution and, to the user, be indistinguishable from the effects of installation accuracy; it can therefore be reduced using the same techniques.
A subtle manifestation of graduation error occurs if the axial graduations on the edge of an angle encoder are yawed or imperfectly aligned with its axis of rotation.
This will have no effect during pure rotary motion, but any axial motion of the encoder scale relative to the readhead (due to end-float in the bearings) will give rise to an incorrect indication of scale rotation. This mechanism is similar to the third swash mechanism described previously. The effect of an incorrectly pitched readhead (i.e. with parallax) used with radial scale is similar.
Error compensation techniques
Once the effect of all the error sources in the motion control system have been determined, a comparison can be made between the accuracy required to achieve the device specification and the performance that could be expected from the uncompensated rotary encoder system. If the required accuracy cannot be achieved with the uncompensated encoder system, a choice must be made between a different encoder system of higher specification (if one can be found to meet the space envelope, delivery schedule and budget) or applying error compensation techniques to eliminate the performance shortfall. The two most powerful compensation techniques are the use of multiple readheads and error maps.
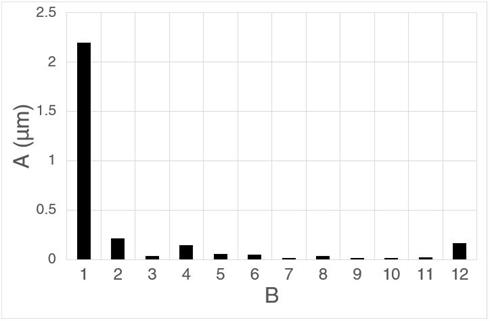
Figure 12. Fast Fourier transform of an error map for a rotary encoder ring; the 1st harmonic corresponds to the ring eccentricity and is the largest component of the total installed error.
A) Error, B) Harmonic
Multiple readheads
Fitting two diametrically opposed readheads will remove the effects of eccentricity, and the higher odd harmonics of repeatable error. It will also remove the effects of bearing wander from angular measurement, but four readheads are normally required to combat bearing wander for accurate polar positioning. Increasing the number of readheads employed will further reduce the repeatable error but it is generally considered that the advantages of fitting more than four are outweighed by the complexity and cost. This multiple readhead technique does not require elaborate calibration to be effective; a great benefit both in terms of time and testing system design.
Error maps
An error map can be used to reduce repeatable errors if the control system of choice is configured to use one. For this technique to be effective, the rotary encoder system must be calibrated by the OEM using an interferometer or another recognised measurement reference after final assembly of the device.
The installer cannot rely on any calibration certificate provided by the encoder manufacturer because any errors introduced during the installation process would be ignored, rendering the error map worthless. It is advantageous to optimise the number of points in the error map: for a sinusoidally varying cyclic error, seven points per cycle will remove approximately 90% of the error at that frequency (as shown in Figure 12). A hundred-point error map will compensate for most of the errors in the first fourteen harmonics but, it should be noted, can potentially increase the errors caused by the higher harmonics remaining. It is worth remembering that this technique has no impact on the effects of bearing wander, shaft torsion or other time-dependent error sources.
Summary
This article has briefly examined some of the trade-offs that must be made to determine a realistic specification for an angle encoder system. It has also considered some of the more significant factors that can limit achievable accuracy and detailed a number of techniques available for improving this achievable accuracy. For further information on this subject, refer to ISO 230-7:2015 (Part 7–Geometric accuracy of axes of rotation).
For further product information, please visit www.renishaw.com/encoder
