Navigation
- CMM knowledgebase
- 3-axis systems
- Scanning probe systems
- SP80 / SP80H
- SP80 and SP80H installation and integration guide
- General information
- Product compliance
- System requirements
- Safety
- System interconnection and electrical integration
- Probe connector pin-outs
- Connecting the IU80 interpolator unit
- IU80 features and LEDs
- SP80 LED control
- Connecting SP80 / SP80H using the KM80 or KM6080
- Connecting SP80 / SP80H using the SM80
- Connecting SP80 / SP80H using UCC PI 80
- Connecting SP80 / SP80H to IU80 and OEM counter card
- Air supply
- Installing SP80 / SP80H air purge option
- Attaching the KM80 quill adaptor plate
- Alternative quill adaptor plates
- Aligning the KM80, KM6080 or SM80 for use with the SCP80(V)
- Mounting the SP80 / SP80H body to the quill adaptor plate
- Mounting / removing the SH80 / SH80K on the SP80 / SP80H body
- Mounting styli on the SH80 and styli orientation
- Fitting the SCP80 / SCP80V to the MRS / MRS2 rack system
- Alignment of the SCP80(V) to the CMM axes
- Establishing SCP80(V) port datums
- Put down and pick up routines for SH80
- Put down and pick up routine for SH80K with SP80
- Put down and pick up routine for SH80K with SP80H
- Modes of operation
- Maximising performance
- SP80 and SP80H stylus selection
- Maintenance
- SP80 and SP80H system integration notes
Navigation
- CMM knowledgebase
- 3-axis systems
- Scanning probe systems
- SP80 / SP80H
- SP80 and SP80H installation and integration guide
- General information
- Product compliance
- System requirements
- Safety
- System interconnection and electrical integration
- Probe connector pin-outs
- Connecting the IU80 interpolator unit
- IU80 features and LEDs
- SP80 LED control
- Connecting SP80 / SP80H using the KM80 or KM6080
- Connecting SP80 / SP80H using the SM80
- Connecting SP80 / SP80H using UCC PI 80
- Connecting SP80 / SP80H to IU80 and OEM counter card
- Air supply
- Installing SP80 / SP80H air purge option
- Attaching the KM80 quill adaptor plate
- Alternative quill adaptor plates
- Aligning the KM80, KM6080 or SM80 for use with the SCP80(V)
- Mounting the SP80 / SP80H body to the quill adaptor plate
- Mounting / removing the SH80 / SH80K on the SP80 / SP80H body
- Mounting styli on the SH80 and styli orientation
- Fitting the SCP80 / SCP80V to the MRS / MRS2 rack system
- Alignment of the SCP80(V) to the CMM axes
- Establishing SCP80(V) port datums
- Put down and pick up routines for SH80
- Put down and pick up routine for SH80K with SP80
- Put down and pick up routine for SH80K with SP80H
- Modes of operation
- Maximising performance
- SP80 and SP80H stylus selection
- Maintenance
- SP80 and SP80H system integration notes
Installing SP80 / SP80H air purge option
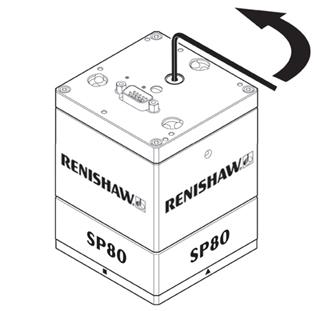
Install the air purge connector by following the steps detailed below:
1. Remove screw as indicated.
2. Screw the supplied air fitting (P-MA01-0043) into the hole.
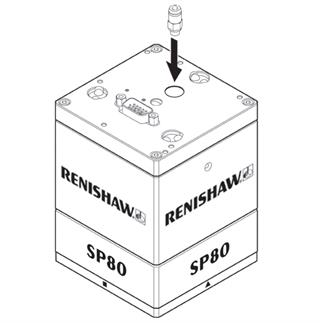
3. Fit the air pipe to the air fitting.