Diese Seite steht derzeit nicht in Ihrer Sprache zur Verfügung. Mittels der
Übersetzungsfunktion
von Google kann Ihnen eine automatische Übersetzung angezeigt werden. Bitte beachten Sie jedoch, dass wir keinerlei Verantwortung für diese
Dienstleistung tragen und die Übersetzung auch nicht von uns geprüft wurde.
Wenn Sie weitere Unterstützung benötigen,
kontaktieren Sie uns bitte.
Precision CNC machine shop improves production rate of aluminium investment castings by more than 80%
Some years ago, ebbing oilfield business conditions spurred Ogden, Utah's LeanWerks to pursue work in other industries (including aerospace and high-speed automation) to establish a more balanced customer base and steadier work flow. The contract shop, now registered to the AS9100C aerospace standard, also began adapting some of its existing machining capacity to better suit the machining jobs it would encounter within those new industries.

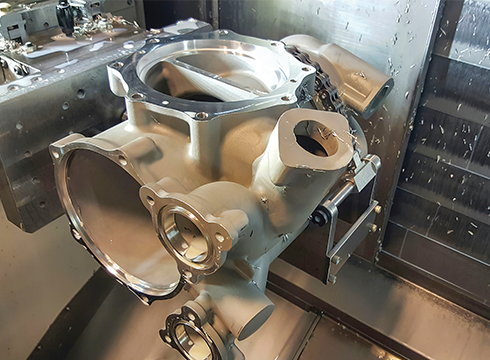
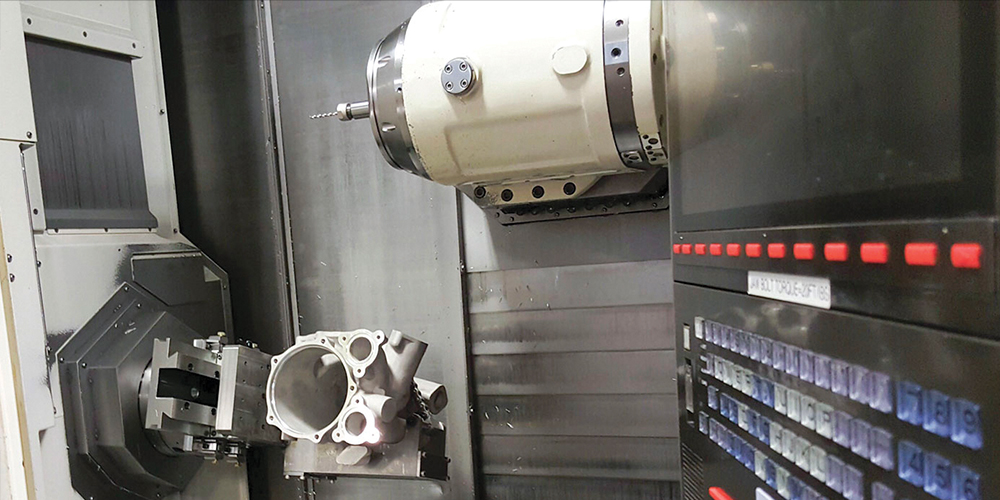
LeanWerks developed a process combining cutting tool, workholding and part-probing technologies to enable its turn-mill to machine five sides of this investment casting part in one setup. Photo Credits: LeanWerks
Reid Leland, company president and co-founder, points to one example: an aluminium investment casting for a jet engine fuel filter housing. By the time LeanWerks was introduced to this job, its aerospace foundry customer was nearly one year behind on the delivery schedule because its in-house machining process, thus production rate, was slow. As a result, its customer — the OEM of the jet engine onto which this housing is installed — was losing patience, and the backlog caused by the delays with this job was disappointing other customers. Therefore, in an effort to alleviate some load on its internal machining resources, the foundry contacted LeanWerks to consider taking on the machining of those castings.
Although many engineers specify investment castings for their part designs because they offer form intricacy with good dimensional precision relative to other casting processes, those components still require machining to achieve accurate fit and function in high-performance assemblies.
However, the variability of these types of as-cast parts and their associated tricky work-holding requirements cause some shops to avoid taking on this type of machining work.
For example, the fuel filter housing requires multiple machining operations, including deep-hole milling, boring, facing, drilling, tapping, inner-diameter grooving and 3D contouring. Originally, LeanWerks thought it might complete the job using several set-ups on a three-axis mill and one setup on a turning centre. It ultimately decided that this wasn't the best strategy, because the part's tight position tolerances with complicated datum scheme would not be attainable due to the multiple set-ups.
Instead, LeanWerks considered how it might take advantage of the milling capability of its Mazak Integrex i200S turn-mill to minimize the number of times the part is touched during machining. The shop primarily used this machine to produce tapered plug valve inserts for high-pressure pumping operations in the oil and gas industry, such as those required for hydraulic fracturing and coiled-tubing applications. The Integrex was well-suited for the valve insert part because it could both turn the part's tapered outer diameter and mill its internal cross-axis flow bores. The machine could also mill the bores associated O-ring, which required a five-axis contouring operation because of the bores conical surface.
That said, machining the fuel filter housing part on the turn-mill, a job that required no turning, presented a variety of challenges. For instance, the A356.0 aircraft-grade cast aluminium has a high silica content and can be hard on cutting tools.
In addition, the part's geometry has multiple features at multiple angles on all faces (including a critical fitting inside the bottom of the 13-inch-deep casting) and thin-walled areas create vibration issues during machining. Plus, the part with complex datum structure requires tight tolerances, including true-position tolerance of 0.25 mm on some widely separated features, and size tolerances of 0.01 mm and true position tolerances of 0.05 mm for other, less separated features.
As a result, LeanWerks essentially took three steps to enable its turn-mill to effectively machine five faces of the investment casting in one setup. The first step was designing a fixture to hold the casting to enable machining to be performed on five sides of the part. A key component of this fixture design is a cradle that engages the main body of the casting while offering access to features between and alongside the cradle legs. To secure the casting to the cradle, a chain and pulley mechanism was installed between the cradle legs to provide an evenly distributed clamping force.
Because the turn-mill did not offer sufficient Y-axis travel to reach all features, a Setco dovetail slide was incorporated in the fixture to enable the cradle and part to be slid and re-clamped in an accessible position without completely refixturing the part. To ensure rigidity, the cradle was mounted and braced to a steel baseplate with dowel pins and welds. That baseplate mounts to the dovetail slide saddle, and the slide base mounts to the master jaws on the machine's existing three-jaw chuck.

Due to the size of this piecework, the turn-mill's Y-axis travel doesn't enable its spindle to reach all areas of the part to be machined. To mitigate this, the fixture LeanWerks developed uses a dovetail slide to enable the fixtured part to be slid and re-clamped in an accessible position. Subsequent probing routines determine the true position of the repositioned part.
Next, the shop integrated a touch-trigger probing system. Touch probing was necessary because the form of each as-cast part varies slightly, and the sliding fixture used to mitigate the Y-axis travel issue changes the location of the part. Probing enabled the new position of the part after the shift to be precisely defined, and the subsequent tool paths to be best fit to the actual part location.
In fact, the shop realised it needed a standard-length probe as well as an extended-reach probe to access features located deep inside the part. Because the turn-mill featured only one probing channel, LeanWerks retrofitted the machine with a Renishaw RMI-Q radio receiver and installed a programmable logic controller (PLC) card in the main machine control panel to handle a second probe signal. The short probe uses a 25 mm long stylus, while the long probe uses a 50 mm long stylus mounted on a 200 mm extension. Both use a Renishaw RMP60 probe body.
The probing routines were programmed using Renishaw's Inspection Plus software, and the resulting code was added to the machine program at the appropriate locations. The initial probing routine measures points on the bottom port inside the housing and the opening at the front of the housing to define the central axis of the part. Other features that are probed include one of the small ports near the face to define the part's rotational orientation and a wall inside the main side flange to define the part's Z-axis location. Mazak's work position error compensation (WPEC) software module allows for deviations detected through true-position calculations derived from the initial probing routine to move with the part through spindle indexing movements. After the initial probing routines, additional probing is performed to confirm the location of related features and post-machined surfaces.
Finally, the deep-reaching machining operations required for this part and abrasive aluminium material led the shop to employ advanced cutting tool technology. For this job, the shop uses the Rego-Fix powRgrip tool-holding system. An alternative to shrink-fit, the powRgrip is a mechanical, press-fit system that consists of a tool-holder, precision collet and compact benchtop hydraulic clamping unit used to insert the collet and tool into the holder. According to Rego-Fix, the system is able to generate high clamping forces while maintaining a total indicator reading of less than 0.0001 inch. The rigidity of this system improves tool life and cutting accuracy.
Cutting tools used for this job must have positive high rake angles and be run at very high speeds with light depths of cut. Garr Alumistar end mills are used as well as a small face mill with uncoated, highly polished, high-positive inserts.
LeanWerks also pre-sets tools for this job using an offline pre-setter. This not only allows for the external setting of tools but, more importantly, aids in qualification and troubleshooting because it facilitates inspection of the cutting edge, validation of the shape of form tools and measurement of run-out.
Turning Point
The process LeanWerks developed to machine this investment casting job on its turn-mill improved the production rate from 10 hours per part to less than two hours per part. As a result, the shop continues to consider other ways it can maximize the capabilities of its existing capacity in similar ways as it pursues work in various new industries.

Originally appeared in Production Machining magazine (productionmachining.com). Copyright 2021, Gardner Business Media, Inc., 6915 Valley Avenue, Cincinnati, Ohio.

