현재 사용 중인 언어로는 이 페이지를 사용할 수 없습니다. Google Translate을 사용하여
자동 번역된 페이지
를 볼 수 있습니다. Renishaw에게는 이 서비스를 제공할 책임이 없으며 번역 결과를 저희가 확인하지도 않았습니다.
추가로 도움이 필요하시면
저희에게 연락해 주십시오.
Machine tool supplier to Ford and Bosch transforms machine accuracy without design changes
Most CNC machine tool manufacturers invest heavily in machine developments that improve accuracy but by using the latest calibration systems at its factory in Istanbul, Turkey, leading manufacturer Spinner has improved specified machine accuracies without the need to change designs.
The key to this improvement is the use of Renishaw's laser calibration systems which are used to calibrate linear axes on all machine models and calibrate every sub-spindle on CNC lathes. The Renishaw QC10 ballbar, designed for rapid machine diagnostic testing, is also used by Spinner to complement the more extensive laser calibration routines; with a final ballbar check being made at a customer's site after a new machine has been delivered. The benefits of this increased accuracy are being felt by customers such as Ford and Bosch Rexroth, who are producing respectively crankshafts and pumps within Turkey.
Several years ago Spinner did not use these systems, instead carrying out a basic set-up which did not take into account all the factors affecting machine positioning performance. Some machine tool suppliers still take this approach, not realising that this creates many more problems for their customers and increases their own customer support costs.

Rotary axis compensation
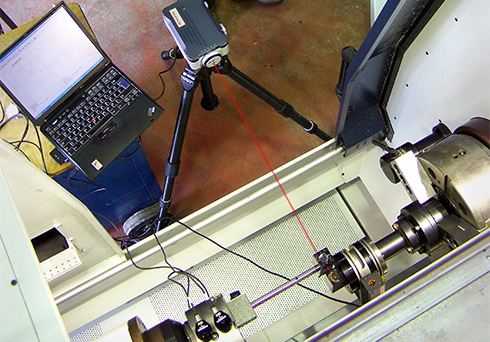
Mr Nurhan explains one of the areas in which Spinner has seen most benefits from laser calibration, “We test and calibrate the rotary motion of every sub-spindle fitted to our turning centres because the encoder on the motor, although repeatable enough, does not position as well as we want. Some encoders are only accurate to 6 arc minutes but by using the Renishaw RX10 rotary calibrator unit, we can guarantee better than 1 arc second repeatability. This is done by testing the sub-spindle on the finished machine. Errors detected by the RX10 are corrected by adding compensation values generated by the RX10 software to registers in the controller. The sub-spindle is tested again to check the new positioning accuracy and provide a traceable calibration certificate, with options for formats according to various international standards.”
The RX10 is an accessory for Renishaw's laser calibration systems, allowing the comparison of the programmed rotation of a drive or rotary table to the actual rotation as measured using a traceable Spinner - sub-spindle laser calibration source. This is done by mounting the RX10 on the rotary axis, then programming the rotary axis to rotate in defined steps. After each axis move, the RX10 unlocks, and rotates back to the previous position, re-locking on a highly repeatable Hirth coupling, accurate to 1 arc second. Angular optics are mounted on the RX10 and any angular error compared to the previous starting position is recorded. These error values are used for compensation.
Testing linear axes on turning centres
Currently, one-in-five of Spinner's CNC turning centres have their linear axes fully calibrated, in response to a customer's request for higher accuracy machines. On those machines that are not calibrated, the machine positioning is checked at only two positions, 0 and 300 mm, adding a single compensation value to the machine's register and not taking into account anything in between. Spinner turning centres can be supplied with three main axes, X, Y and Z, and also the moving axis for the sub-spindle.
Mr Nurhan explains the advantages of using the Renishaw laser calibration system, “Backlash can change along the length of the axis and repeatability is not consistent, so the step by step measurement we can perform with the laser is ideal. We set the movement steps to 10 mm, the same as the ball screw pitch, to pick up on backlash at each point. The tests are done before and after error compensation to see the difference.” To prove machine capability to customers, Spinner delivers all tested machines with a calibration certificate, traceable to international standards.
Shortly Spinner will be calibrating all linear axes on all machines as standard, whether or not a customer requests it. Mr Nurhan feels that the benefits fully justify this, “Spinner has employed an engineer dedicated to machine calibration, and his job will be to test all the axes on every machine.
We test and calibrate the rotary motion of every sub-spindle fitted to our turning centres because the encoder on the motor, although repeatable enough, does not position as well as we want. Some encoders are only accurate to 6 arc minutes but by using the Renishaw RX10 rotary calibrator unit, we can guarantee better than 1 arc second repeatability.
Spinner (Turkey)
QC10 ballbar tests
Complementing Spinner's laser calibration system are two Renishaw QC10 ballbars which allow rapid tests of a machine's positioning performance. A single test, typically taking around 15 minutes, is all that is required, analysing 22 possible sources of error and producing reports to international standards, including single figure indicators of overall performance (circularity and position deviation). Spinner uses the ballbars for two separate tests on every machine.
The first is at the factory, mainly to set up the machine control systems. One aspect in particular that they can quickly sort out is axis synchronisation, ensuring that all axes during combination moves arrive at their destination at the same time. The second ballbar test is run when the machine is delivered to a customer's site, this time to examine the mechanical and structural characteristics, helping to adjust and level the machine. The ballbar test results show whether the axes are square to each other, giving exact values for any adjustment required. This test is repeated after adjustment to give final proof that the machine is level.
The Renishaw XL-80 laser calibration system
Renishaw has recently introduced the XL-80 laser interferometer measurement system to replace its previous market leading ML10 laser system, used by thousands of customers worldwide. The XL-80 system is more compact, with higher accuracy, and is quicker and easier to set-up. The dimensions of the XL-80 make it very portable, so an engineer can easily transport it by car, and even carry it as hand-luggage on a flight. Accuracy of the laser is more than sufficient for machine tool calibration at ±0.5 micron/metre, with maximum linear resolution of 1 nm, and a maximum linear measurement speed of 4 m/s.
Each XL-80 is certified to international standards during its manufacture and servicing, using Renishaw's in-house reference laser, which is traceable to the UK's National Physical Laboratory iodine-stabilised reference laser. This is recognised as those equivalent to many other national length standards such as those used at PTB (Germany) and NIST (USA).
Spinner goes from strength to strength

The Spinner plant opened in Istanbul in 2000, producing seven machines a month. This increased to 30 machines a month in 2007, and with 160 employees, the factory is a hive of activity at every stage of production. Spinner is aiming to be despatch 50 machines a month in 2008, and by 2010 plans to employ more than 500 people. Clearly, they are in the middle of a carefully planned expansion, a good example being the training of an engineer solely to act as a calibration expert.
The Istanbul plant produces Spinner's range of TC turning centre machines, while the SP, PD and UP (ultra precision) ranges are made in Germany. 80% of the Turkish TC machines are sold in Germany, with 20% sold to other countries, in particular Turkey, Pakistan, India and Malaysia. There are now over 100 machines in Turkey, at companies such as Ford, Bosch Rexroth, and CMS, a large supplier of automotive wheels.

