Navigation
Installation procedure
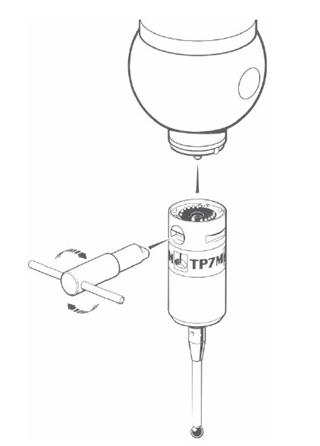
Mounting the probe on the probe head
Whenever practical, follow the instructions given later in this section to assemble the stylus to the probe before installing the probe on the probe head.
Locate the probe on the probe head, ensuring that the alignment dots on the head and probe are adjacent, and then lock the autojoint by clockwise rotation of the slotted actuator shaft using an S10 key (supplied).
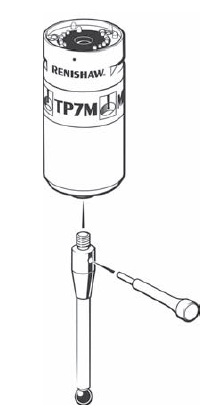
Assembling a stylus to the probe
Screw the stylus into the threaded mount on the probe until finger tight. Fit the stylus tool(s) (supplied) into the stylus cross-hole and tighten using finger pressure. The stylus tool is designed to bend if over-tightened, preventing damage to the probe.
If the stylus has been assembled with the probe in-situ on the probe head, it may be necessary to reset the probe. Refer to the following section ‘Resetting the probe'.
Resetting the probe
The probe will automatically reset to the armed state when the PI 7-3 is powered up or the TP7M is fitted to the probe head. It may sometimes be necessary to perform a manual reset, for example after fitting a new stylus. Press the RESET button on the front panel for 2 seconds to reset the probe to the armed (seated) state.

Indicator | Colour | Function |
POWER ON | Green | Mains power in |
TYPE STD | Green | Kinematic probe selected |
TYPE TP7 | Green | TP7M probe selected |
PROBE SEATED | Green | ON - Probe armed (seated) OFF - Probe triggered or no probe connected |
PROBE DAMPED | Yellow | PDAMP asserted |