Navigation
Probe installation
SP600 probe
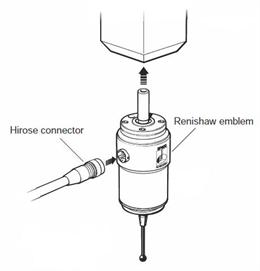
The shank mounted SP600 attaches simply and quickly to any CMM providing that the correct shank attachment has been ordered as shown below. The shank is inserted into a mechanical fixing mechanism and tightened into place, with the Renishaw emblem facing the front of the CMM. The probe cable should then be connected to the external hirose connector on the side of the SP600.
SP600M probe
The SP600M probe may be mounted on either the PH10M PLUS / PH10MQ PLUS range of motorised probe head or the PH6M fixed probe head by means of the Renishaw autojoint. Locking and unlocking of the autojoint is carried out either manually, using the autojoint key, as shown below, or automatically using the Renishaw autochange rack system. In both cases, the connection repeatability eliminates the need for probe requalification after exchange.
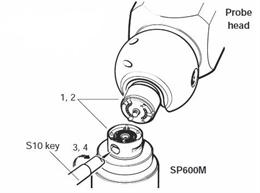
- Align the black dot on the probe with the black dot on the head.
- Locate the two halves of the joint together.
- Insert the S10 key in the slot.
- Turn the key clockwise until it locks tight.
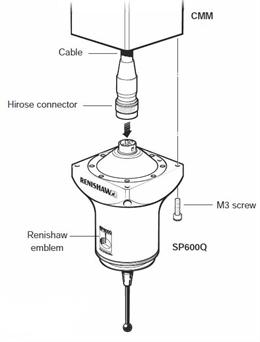
SP600Q probe
The SP600Q is mounted directly onto the quill using four M3 screws as shown below. The cable (PL82V) is connected using a hirose connector at the probe end. The Renishaw logo must be facing to the front of the CMM.