Navigation
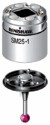
Attaching an SH25 stylus holder to an SM25 scanning module
The range of SH25 stylus holders have a kinematic coupling that connects to each respective SM25 scanning module. This connection eliminates the need for probe requalification (recalibration) after changing tools. The change can be performed manually or automatically using an FCR25 flexible change rack (highly recommended for optimum performance).
Each stylus holder is only compatible with its respective scanning module. Incorrect combinations are prevented by the unique position of the orientation ball in the stylus holder kinematic joint. All SH25 stylus holders use the Renishaw M3 range of styli.
Manually attaching an SH25 stylus holder to an SM25 scanning module
- Align the front of the stylus holder and probe module.
- Slowly connect the stylus holder to the bottom of the probe module. Allow the magnets to carefully connect the kinematic joint between the stylus holder and module.
- Gently rotate the stylus holder to ensure a correct connection.
To remove the stylus holder, hold and carefully tilt to break the kinematic joint.
Attaching a stylus to a stylus holder
- Ensure the stylus holder is not attached to the probe module.
- Always stay within the recommended stylus capability range for each stylus holder.
- Avoid touching the kinematic face of the stylus holder.
- When tightening the stylus ensure that the correct M3 stylus tool is used.