Navigation
Sequence mode
When the battery is first inserted, sequence step 1 contains the contents of memory 1, sequence step 2 contains the contents of memory 2 and so on up to sequence step 19. Step 20 contains an end of sequence marker (E).
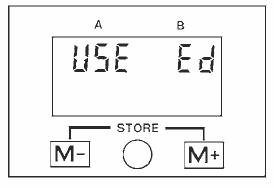
By pressing the M+ and M- buttons simultaneously (for 5 seconds) when the head is locked in simple mode, sequence mode is entered.
The display gives the choice to either use the existing sequence (press M- button) or edit the sequence to create a new one (press M+). If no choice is made within 5 seconds, the display will return to simple mode.
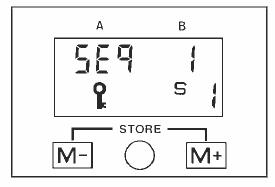
Step 1
Pressing the M+ button to edit, the sequence is entered at step 1. The existing contents of this step (in this case memory 1) are also displayed.
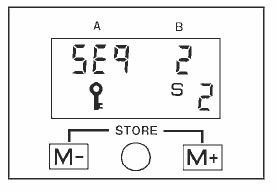
Step 2
Pressing M+ or M- will increment or decrement the sequence step numbers and the display will show the memory number stored in each sequence step. Keeping the M+ or M- buttons pressed will scroll through the sequence steps at the rate of two per second.
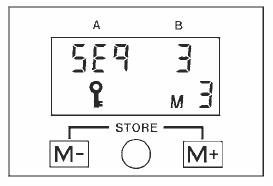
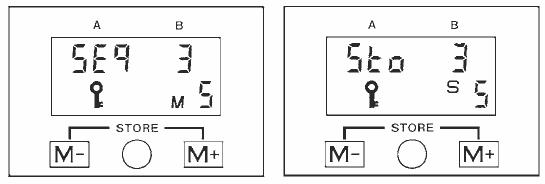
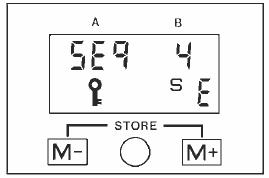
Step 3
Once the sequence step to be changed is chosen (in this example step 3 currently containing memory number 3), pressing the M+ and M- buttons simultaneously for between half a second and 3 seconds* changes the display.
The S character disappears and the M character will be shown. This confirms that the sequence step chosen (step 3) is now frozen, and that the new contents can be chosen by pressing either the M+ or Mbutton to scroll up or down through the memory numbers.
Step 4
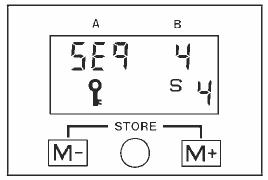
Once the memory number to be stored in sequence step 3 has been chosen (in this example memory 5), pressing the M+ and M- buttons simultaneously for between half a second and 3 seconds* will store memory 5 in sequence step 3. This is confirmed by a store (Sto) message appearing on the display. The M character disappears and the S character reappears, confirming that the function of the M+ and M- buttons has been transferred back to selecting sequence steps.
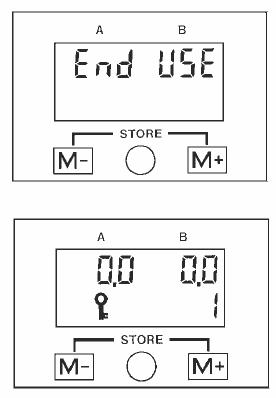
* If the buttons are held for longer than 3 seconds, the display will revert to the ‘End USE' screen (see step 7).
Step 5
The sequence now has three steps:
step 1 containing memory 1
step 2 containing memory 2
step 3 containing memory 5.
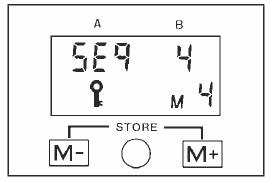
To end the sequence, the end of sequence marker (E) must be placed in sequence step 4. Pressing the M+ button will increment the sequence to step 4 and the display will show the current contents as memory 4.
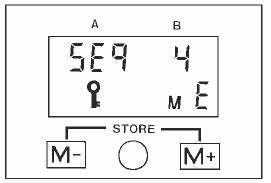
Step 6
Press M+ and M- simultaneously for between half a second and 3 seconds. This changes the display. The S character is replaced by the M character as before.
Press and hold either the M+ or M- button until the end of sequence marker (E) is displayed. This is positioned between M19 and M1.
Store E in sequence step 4 by pressing the M+ and M- buttons simultaneously for between half a second and 3 seconds.

The sequence is now complete and is as follows:
Step 1 (M1), Step 2 (M2), Step 3 (M5), Step 4 (E).
Step 7
To exit from editing a sequence, press the M+ and M- buttons simultaneously for longer than 3 seconds. The display will give a choice of either ending sequence mode or using the sequence.
Pressing the M- button or taking no action for 5 seconds will return the display to simple mode. Pressing the M+ button enables use of the stored sequence.
NOTE: To reset the sequence back to its original form (step 1containing memory 1, step 2 containing memory 2, etc), simply place the end of sequence marker (E) in sequence step 1 during sequence editing.