Navigation
Fitting the SCP80 / SCP80V to the MRS / MRS2 rack system
Fitting SCP80 to the MRS rail
The SCP80 change ports can be fixed to an MRS or MRS2 rack system. It is recommended that they are attached to the MRS / MRS2 rail using the following procedure, where it is assumed that the MRS / MRS2 rack system is correctly installed.
Installation procedure
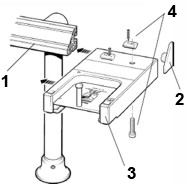
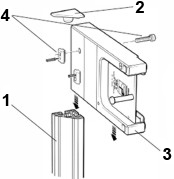
- Loosely assemble the T-nuts and bolts [4] to the mounting holes in the SCP80 [3] *.
- Offer up the SCP80 [3] to the MRS rail [1] and align the T-bolts with the slot on the underside of the rail.
- Slide the SCP80 onto the rail to the desired position, ensuring that sufficient operating clearance exists to carry out all SH80 docking routines.
- Using the hexagonal key supplied, hand-tighten the T-nuts and bolts.
- Align the SCP80 to the CMM axes, as described in 'Alignment of the SCP80(V) to the CMM axes', before finally tightening it to the MRS rail.
- Fit end caps to the MRS rail.
 |  |
Key | Description |
|---|---|
1 | MRS / OEM rail |
2 | End cap |
3 | SCP80 / SCP80V |
4 | T-nuts and bolts * |
NOTE: SCP80V will fit to MRS using the same method. The rail for SCP80V is supplied by the OEM and may look different to that illustrated.
* NOTE: T-nuts must be used with the MRS system. However T-nuts and D-nuts are compatible with the MRS2 system.