Navigation
SCR600 installation
Mechanical alignment
This section describes the mounting and physical alignment of the SCR600 stylus rack to a CMM axis.
Step 1 - Mounting to the CMM
- Secure the location plate to the CMM table using a suitable mounting screw.
- Tighten securely.
- Locate the SCR600 onto the location plate and turn the grub screw clockwise using a 1.5 mm hexagonal key.
- Do not tighten fully.
Step 2 - Physical alignment
- Align the SCR600 to the CMM's X or Y-axis by probing on points one and two (P1 and P2 shown on page 'Datuming SCR600').
- Adjust the position so that the suggested maximum runout of 0.10 mm (0.0019 in) is achieved between P1 and P2.
- Carefully tighten the grub screw.
- The SCR600 is now ready for datuming (see page 'Datuming SCR600').
SCP600 installation onto MRS / MRS2
It is recommended that the stylus changing port units (SCP600) are attached to the rail using the following procedure where it is assumed that the MRS / MRS2 system is correctly installed. For full details, please refer to the MRS / MRS2 installation and user's guide (Renishaw part number H-1000-5088 / 5255):
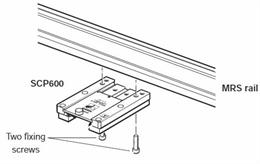
- Insert one of the fixing screws through the SCP600.
- Offer up the SCP600 to the rail, positioning the fixing screw to the respective ‘T' nut within the rail. Finger-tighten the screw.
- Insert the other fixing screw through the SCP600 port.
- Position the SCP600 so that the second screw locates into the respective ‘T' nut in the rail. Finger-tighten the screw.
- Using the hexagonal key supplied, hand-tighten the two fixing screws into the ‘T' nut.